Last reviewed: 2026-09-15 (UTC)
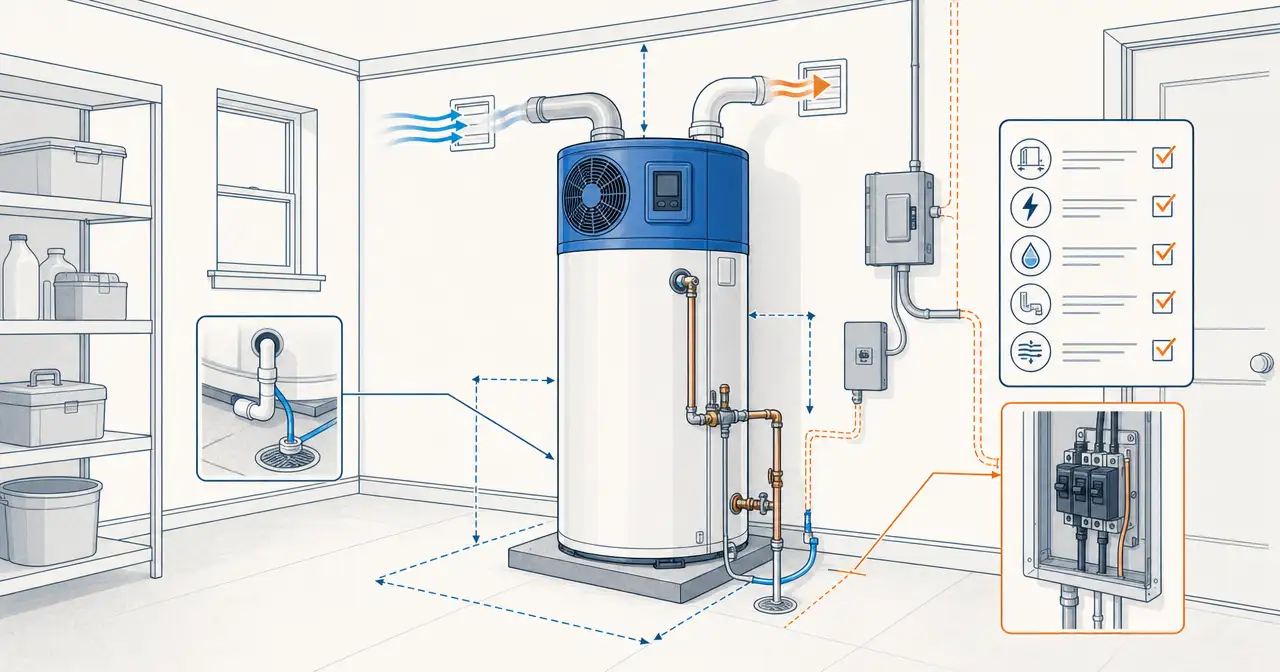
Planning a heat pump water heater installation means planning more than a tank swap. The new unit needs surrounding air, a defined condensate route, the right electrical scope, safe plumbing hardware, and room for maintenance. A good quote makes those decisions visible before the old tank comes out. Use this guide to screen the location, choose the right installation lane, and check the work at startup.
Quick answer
| Installation question | Practical answer |
|---|---|
| What is the easiest installation? | A same-location electric-to-electric replacement in a room that meets the model manual, with a verified circuit and a clear drain path. |
| How much room does it need? | Published guidance ranges from about 450 to 700 cubic feet for many manufacturer requirements to a 1,000-cubic-foot planning baseline. The manual for the exact model controls. |
| Does it need 240V? | Many standard integrated models use a dedicated 208/240V circuit, often around 30 amps. Model-specific 120V options exist, with different capacity and wiring decisions. |
| Can it go in a closet? | Sometimes. The closet needs enough air, clearances, service access, and a deliberate louver, grille, or ducting plan. |
| Where does condensate go? | To a suitable drain by gravity when possible, or to a condensate pump when gravity drainage will not work. It should never be left to drip onto the floor. |
| When should you hire a pro? | When the job involves a new circuit, panel work, a gas-to-electric conversion, ducting, a difficult drain route, nonstandard plumbing, or permit and inspection work. |
Heat pump water heater installation checklist
Use this checklist before approving a model or a quote.
| Stage | Confirm | Why it matters |
|---|---|---|
| Before buying | Measure the room's length, width, height, door opening, tank footprint, ceiling height, and service clearances. Photograph the room, water heater nameplate, drain, and electrical panel. | Heat pump water heaters are often taller and heavier than resistance tanks. A footprint match does not prove that the airflow, filter, display, or plumbing connections will fit. |
| Before buying | Compare the model's tank size and First Hour Rating with the household's peak demand. | A larger tank can reduce resistance-element operation when the household uses a lot of hot water. |
| Before work begins | Mark the electrical path as existing circuit, new circuit, or model-specific 120V option. | “Existing electrical” is too vague for a quote. The breaker, conductors, circuit type, panel capacity, and model requirements all need to match. |
| Before work begins | Name the condensate destination, drain slope, pump, overflow shutoff, and access for cleaning. | Condensate becomes a property-damage problem when the drain route is improvised after the tank is in place. |
| Before work begins | Put the T&P discharge line, drain pan, pan drain, expansion tank, mixing valve, heat traps, shutoffs, and seismic bracing in the scope where they apply. | These items depend on the model, the existing system, local code, and the location. They should not appear as surprise extras. |
| At startup | Confirm the unit is level, the tank is full before power is energized, water connections are dry, condensate is flowing, and the T&P discharge is open and correctly terminated. | A rushed startup can damage heating elements, hide leaks, or leave a blocked drain and unsafe relief discharge. |
| At handoff | Record the operating mode, temperature setting, filter location, condensate cleanout, alarms, maintenance interval, and installer or manufacturer contact. | The installation is incomplete if the homeowner cannot maintain the unit or recognize a drainage problem. |
Tools and materials: decide the lane first
This is a planning block, not a universal shopping list. The exact parts come from the model manual and local requirements.
| Scope | Homeowner can usually plan or supply | Pro or model-specific scope |
|---|---|---|
| Site check | Tape measure, level, flashlight, phone camera, room measurements, panel and nameplate photos | Model clearance diagram, airflow calculation, duct design, structural or seismic details |
| Moving and positioning | A clear path and a capable helper | Hand truck, straps, level base, lifting help, and safe placement of a heavy, top-heavy tank |
| Water connections | Shutoff location, approved flex connectors or unions where allowed, pipe insulation | Hot and cold connections, new valves, fittings, heat traps or check valves, and any changes required by the model or code |
| Safety hardware | A list of items to price | T&P valve discharge pipe, drain pan and pan drain, expansion tank, mixing valve, pressure-reducing valve, and seismic straps where required |
| Condensate | A known floor, sink, laundry, or other approved drain | Correct line size and slope, cleanout or tee, condensate pump, discharge route, and overflow shutoff when the model supports it |
| Electrical | A non-contact tester is useful for a homeowner documenting the existing setup, after power is safely off | Circuit, breaker, conductor size, disconnect, receptacle or hardwire method, grounding, and GFCI protection must follow the model and jurisdiction |
If the project is an electric-to-electric replacement, the room fits the chosen model, the existing circuit has been verified, and local rules allow homeowner work, a capable DIY homeowner may be able to handle the physical replacement. A helper is still important for moving the tank, and power should never be treated as safe based only on a breaker label.
Plan on a qualified professional when the work includes a new branch circuit, panel changes, gas-line or venting changes, a confined or ducted installation, a condensate route that needs a pump or new plumbing, unusual water-piping changes, or permit and inspection coordination. This boundary keeps the homeowner planning work useful without turning a general guide into permission to perform work that requires trade knowledge or a license in the jurisdiction.
Start with the model manual
Heat pump water heater requirements are not interchangeable. Before a quote is final, read the installation manual for the exact model and confirm:
- minimum room volume, ambient-temperature range, and intake and exhaust clearances
- whether the model allows a closet, louvered door, transfer grilles, or ducting
- tank height, diameter, connection locations, and side-discharge direction
- voltage, amperage, breaker, conductor, disconnect, receptacle, and GFCI requirements
- condensate fittings, drain-line size, maximum lift, slope, freeze protection, pump, and overflow connection
- T&P discharge material and termination, drain-pan instructions, expansion-tank requirements, and recirculation connections
- fill, startup, operating-mode, filter, and maintenance instructions
The manual controls the exact unit. Current ENERGY STAR, DOE, and PNNL guidance helps you identify the questions a quote must answer, while local plumbing, electrical, mechanical, building, and fire rules can add requirements.
Room fit, airflow, and closet ventilation
An integrated heat pump water heater takes heat from the air around it and releases cooler, drier air. That makes the room part of the system.
For a general planning baseline, DOE's technical snapshot uses a 40°F to 90°F operating space and about 1,000 cubic feet of air around the heater. The current ENERGY STAR FAQ also explains that many manufacturers specify about 450 to 700 cubic feet, with integrated units designed for spaces around 40°F to 120°F. Those ranges describe different planning frames. They are not permission to ignore the model manual.
The easiest locations are usually basements, garages that stay above freezing, and larger utility or laundry rooms. A room near a furnace or another source of waste heat may work well. If an atmospherically vented furnace, boiler, fireplace, or other fuel-burning appliance shares the room, have a qualified professional evaluate combustion air, draft, and separation before work begins. Building Science Education's safety guidance explains why natural-draft appliances need special care in tight homes. A small interior closet can work only when its air path, cool-air discharge, sound, condensate, and service clearances are designed together.
Closet ventilation decision
| Situation | Planning response |
|---|---|
| The room meets the model's air-volume and clearance requirements | No added venting may be needed. Keep the intake and exhaust path open and keep filter and control access clear. |
| A small closet opens to a larger indoor area | Use a full louvered door or properly sized high and low transfer grilles. ENERGY STAR's best-practice guidance uses at least 240 square inches of total net-free area, which means the open area between grille fins, not the outside dimensions of the grille. |
| The closet needs active ducting | Keep ducts short, straight, and unrestricted. The manual sets duct size and maximum length. Send cool exhaust toward a space where it will not disturb occupants. |
| The design ducts to outdoors | This is a warm-climate, balanced-intake-and-exhaust decision. Do not duct only the intake or only the exhaust outdoors, do not run a duct between a garage and the heater where it could bring exhaust fumes into living space, and do not point cool exhaust at a thermostat. |
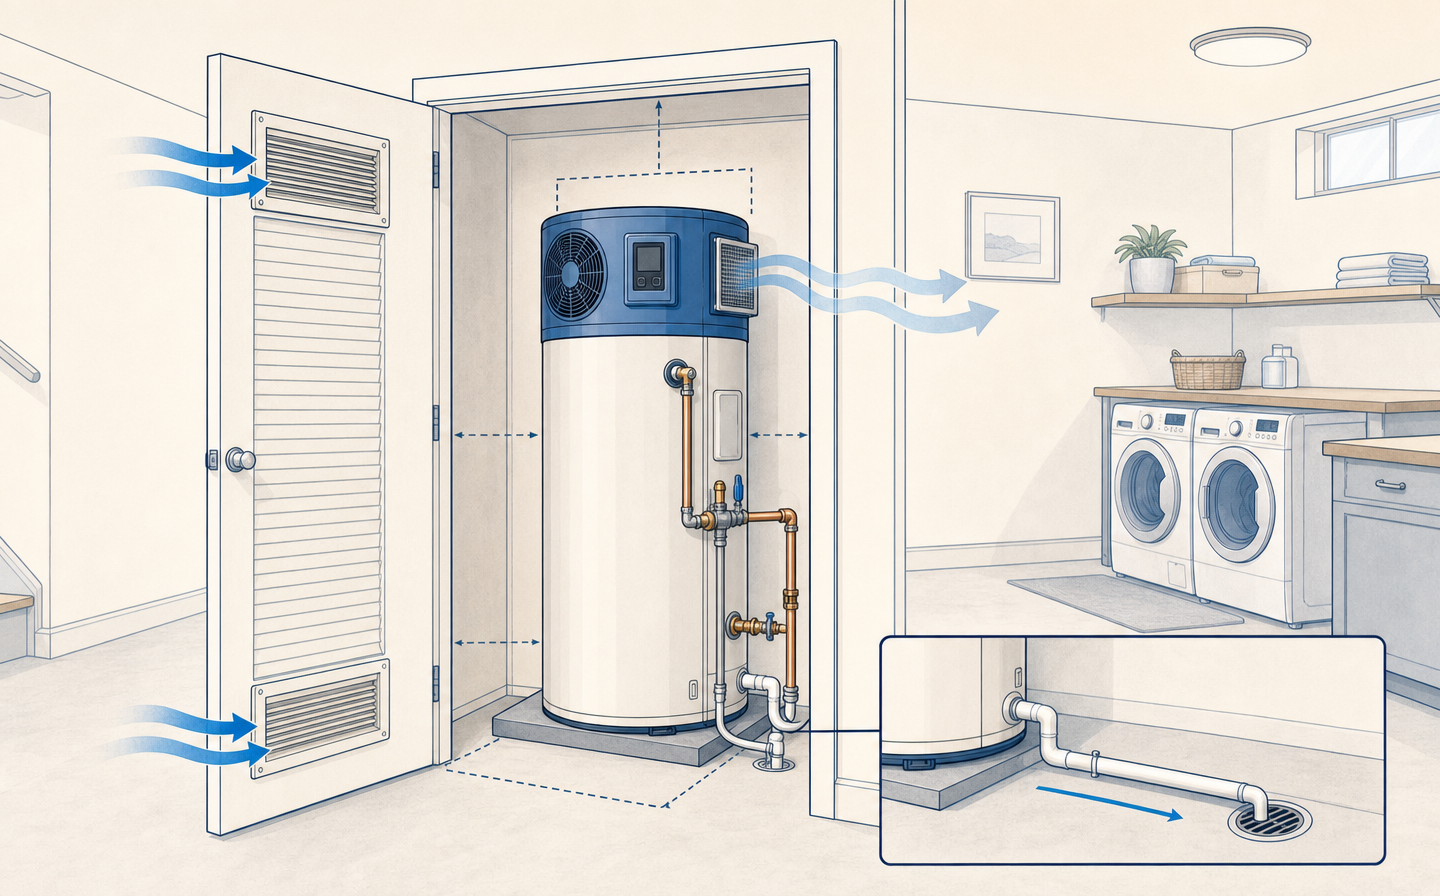
Simplified airflow and drainage layout, not installation instructions.
Noise and cooling also belong in the location decision. ENERGY STAR describes many units as roughly 45 to 55 dBA, similar to a dishwasher, and says active heat-pump operation can provide about 2,500 to 5,000 Btu per hour of localized cooling. A basement or garage may make those effects easy to live with. A bedroom wall or a frequently used hallway may not.
Size the tank and define the electrical scope
Start with the existing tank's gallon capacity and Energy Guide label, then compare the household's peak use, number of occupants, consecutive showers, baths, and appliances. The PNNL planning tool uses 700 cubic feet as a pre-screen and asks for photos of the location, electrical panel, and existing nameplate, along with household demand, condensate access, and available circuits. That is a useful pre-quote packet, even when an installer does the work.
Many standard integrated models use a dedicated 208/240V circuit, often around 30 amps. The exact model may require a different current, wire size, breaker, hardwire method, disconnect, or GFCI arrangement. An existing electric tank circuit is a starting point for inspection, not proof of compatibility.
120V plug-in models can reduce electrical work in some gas-replacement or limited-panel projects. They still require model-specific planning for the receptacle or circuit, tank size, recovery, hot-water demand, and any shared-load limits. Lower wiring scope does not make a 120V unit equivalent to every 240V installation.
If the quote changes from a water-heater replacement to a new circuit, panel modification, or service upgrade, keep those line items separate. Watt Wallet's electric panel upgrade guide can help you recognize when the electrical scope has become a second project.
Plumbing, safety hardware, and condensate
Water connections and relief protection
The water side usually includes hot and cold connections, a cold-water shutoff, flexible connections or unions where allowed, pipe insulation, and any required heat traps or check valves. ENERGY STAR's installation practices also recommend flexible piping to reduce vibration and call out drain pans, mixing valves, heat traps, and T&P relief discharge as installation details.
The temperature and pressure relief valve is a safety device, and its discharge line needs to follow the model manual and local code. ENERGY STAR's best-practice guidance places the termination within 6 inches of a floor drain to reduce the chance that hot discharge water reaches people or electrical parts. Treat that as a planning reference, not a universal substitute for local requirements. The line should remain open and should not be capped or plugged.
A drain pan serves a different purpose. It catches leakage from the tank or connections, while the T&P line safely handles a relief event. ENERGY STAR recommends a pan as a best practice where a leak could damage the floor, even when the model has leak detection or automatic shutoff. If a pan is installed, its outlet needs its own suitable, pitched drainage route. Do not assume the T&P discharge, condensate line, and pan drain can share one termination.
In a closed water system, a thermal expansion tank may be required. A mixing valve may let the tank store hotter water while delivering a safer fixture temperature, and ENERGY STAR estimates that raising storage from 125°F to 140°F can add the usable hot water of roughly 10 to 15 gallons. Both the model and local code determine whether those parts belong in the installation.
Condensate routing
Condensate is water collected from moisture in the surrounding air. It still needs a controlled route.
Use a gravity drain when the route can maintain a continuous downward slope from the unit. Current ENERGY STAR design guidance points to floor drains, trench or hub drains, mop sinks, standpipes, utility sinks, or laundry sinks, and says the line should not rise above the unit's discharge port. It also advises against draining condensate into the safety pan or directly into drain-waste-vent piping. A condensate pump is appropriate when gravity drainage is impractical, such as when the drain is too high or too far away. The model manual controls the fitting, line size, lift, discharge point, freeze protection, and overflow-shutoff details.
Give the line a cleanout or removable tee where the manual and installer allow it. ENERGY STAR's technical guide recommends yearly condensate-line cleaning, and standing water in a lower pan can signal a blocked drain or line. A pump without a clear discharge route or overflow protection is an incomplete plan.
Recirculation needs its own decision
An existing hot-water recirculation loop can change how a heat pump water heater operates. A long loop may benefit from an on-demand, motion-sensor, or occupant-activated pump. ENERGY STAR recommends returning the loop to the cold inlet so cooler water enters the bottom of the tank, and warns against continuously operated recirculation because it can force the unit into Electric Only mode, reduce hot-water availability, and increase energy use.
Before installation, tell the contractor whether the home has a recirculation loop and how its controls run. Watt Wallet's hot-water recirculating pump guide explains the control choices in more detail.
DIY or hire a pro?
The safe boundary is easier to see when the whole project is treated as a set of conditions.
| DIY may be reasonable when all of these are true | Hire a qualified professional when any of these apply |
|---|---|
| The replacement is electric-to-electric and stays in the same location. | The project converts from gas, oil, or propane, or changes combustion venting or gas piping. |
| The exact model fits the room, airflow, clearances, plumbing connections, and service path. | The room needs ducting, louvered doors, transfer grilles, structural changes, or a new location. |
| The existing electrical circuit has been inspected and matches the model. | The job needs a new circuit, breaker, receptacle, hardwire run, panel work, GFCI decision, or service upgrade. |
| A gravity condensate route already exists and local rules allow the homeowner to do the work. | The drain needs a pump, new plumbing, freeze protection, unusual routing, or an overflow shutoff. |
| The homeowner can safely drain and move the tank and make permitted plumbing connections. | The tank is difficult to move, the plumbing is nonstandard, or the installation requires trade permits or inspections. |
| The homeowner understands the manual, fills the tank before energizing it, checks for leaks, and can complete the maintenance handoff. | The homeowner is unsure about electrical safety, T&P discharge, local code, startup, or warranty requirements. |
Permit rules, homeowner licensing, inspection steps, and required trades vary by jurisdiction and by scope. Ask the installer to identify who handles each permit and inspection. Watt Wallet's water-heater permit guide is a useful planning companion, though it cannot replace the rules for the home's address.
Heat pump water heater installation steps
The exact work sequence follows the model manual, the local code path, and the site. A homeowner-level planning sequence looks like this.
1. Confirm the model, room, and hot-water demand
Before disconnecting the old tank, verify room volume, ambient temperature, tank height and diameter, clearances, airflow method, connection locations, condensate route, and First Hour Rating. If a 120V model is under consideration, include its recovery behavior and circuit limits in the comparison.
2. Freeze the quote and permit scope
Mark every line item as included, excluded, or still to be verified. The quote should identify the model, tank size, electrical work, plumbing safety hardware, condensate plan, haul-away, permits, inspections, startup, and homeowner handoff.
3. Shut down and remove the old tank safely
Power and water are shut off, the electrical state is verified, the tank is drained, and the old connections are removed. PNNL's installation guide emphasizes verifying that power is off before disconnecting and keeping the tank full of water before the new unit is energized.
4. Prepare the base and position the new unit
The unit is set level on the planned base or pan, with the control panel, air filter, water connections, electrical connection, condensate outlet, and side-discharge fan accessible. Heat pump water heaters can be heavier and more top-heavy than the tank they replace, so movement and placement deserve their own safety plan.
5. Connect water and safety hardware
The installer connects hot and cold lines, shutoffs, flexible piping or unions, the T&P discharge, pan drain, expansion tank, mixing valve, heat traps, insulation, and seismic straps where the model and jurisdiction require them. The T&P line and pan drain remain separate systems unless an approved design says otherwise.
6. Complete airflow and condensate work
The installer confirms that intake air can reach the unit, cool exhaust has somewhere appropriate to go, closet grilles or ducts meet the model's requirements, and condensate flows to the planned drain or pump. A cleanout and pump overflow protection should remain accessible.
7. Fill the tank before energizing it
Open the cold-water supply and a hot-water faucet to release air. Check for a steady stream, inspect every connection, and follow the model's fill procedure before power is turned on. Energizing an empty tank can damage heating components.
8. Commission the unit and complete the handoff
The installer verifies the operating mode, temperature, first heat-up, leak detection, alarms, condensate flow, filter access, and controls. The homeowner should leave with the manual, model and serial information, permit or inspection details, filter interval, condensate-cleaning instructions, and the recirculation setting if a loop exists.
What to check in the quote
Before comparing totals, ask each installer to answer the same questions:
- Which exact model and size are included? Does the First Hour Rating fit the home's peak demand?
- What room assumptions were verified? Does the model fit the air volume, temperature, ceiling, door, service clearances, and sound expectations?
- What electrical work is included? Is the quote based on a verified existing circuit, a new 240V circuit, or a 120V option?
- Where will condensate drain? Is the route gravity-fed, and if not, are the pump, tubing, discharge, and overflow shutoff priced?
- Which safety hardware is included? Ask about the T&P discharge, drain pan and pan drain, expansion tank, mixing valve, heat traps, shutoffs, and seismic straps.
- Who handles permits and inspections? Put the answer in writing because requirements vary by address and scope.
- What does startup include? The quote should say who fills, powers, tests, configures, and explains the unit.
- What is excluded? Look for electrical upgrades, ducting, door changes, drain work, haul-away, wall repairs, and code corrections.
If you need to send information before a site visit, gather photos of the existing heater, nameplate, room, drain, and panel. The same planning tool uses that intake to screen household demand, room conditions, condensate access, and circuit options.
If incentives affect the purchase timing, use Watt Wallet's rebate guide, tax-credit guide, and state rebates after the equipment and installation scope are clear.
Maintenance to include in the handoff
The installer should show the homeowner where the filter, condensate connection, cleanout, drain pan, controls, and alarms are located. ENERGY STAR's technical guide recommends cleaning air filters every 6 to 12 months, more often in dusty locations, and cleaning condensate lines every year. The exact manual may require a different schedule.
Also confirm that:
- the pan is dry and its drain is visible
- the condensate line has not sagged, frozen, kinked, or lost its slope
- the operating mode has not been changed to Electric Only without a reason
- the recirculation pump is not running continuously
- the water and electrical connections remain dry and secure
- blanket insulation has not been added against the model manual or warranty instructions
FAQ
What is required to install a heat pump water heater?
The location needs model-compatible air volume and temperature, service clearance, a matching electrical plan, hot and cold water connections, T&P safety discharge, a condensate route, and any drain pan, expansion tank, mixing valve, heat traps, or seismic bracing required by the model and local rules.
Does a heat pump water heater need a 240V circuit?
Many standard integrated models use a dedicated 208/240V circuit, often around 30 amps. Some current models use 120V. The manual and an electrical inspection determine the correct voltage, circuit, breaker, conductors, receptacle or hardwire method, and protection.
Can I install a heat pump water heater in a closet?
Sometimes. The closet must meet the exact model's air-volume and clearance requirements and needs a planned intake and exhaust path. A full louvered door, high and low transfer grilles, or ducting may work. ENERGY STAR's best-practice guidance uses 240 square inches of total net-free grille area as a planning reference.
Where should the condensate line go?
Use a suitable drain with a continuous downward slope when possible. If the drain is too high or too far away, use a condensate pump with the model's required discharge and overflow protection. Do not send condensate to the safety pan or leave it on the floor.
Should the quote include a drain pan and T&P discharge line?
The quote should identify both. A drain pan helps contain leaks where the floor is vulnerable, and the T&P line safely directs a relief event. Their requirements vary by model, location, and jurisdiction, so each should have a named destination and scope.
Can I install a heat pump water heater myself?
Possibly for a same-location electric-to-electric replacement with a verified compatible circuit, workable plumbing, a simple condensate route, and homeowner work allowed locally. New electrical circuits, panel work, gas conversions, ducted closets, difficult drainage, and permit-heavy jobs belong with qualified professionals.
Do heat pump water heaters work in cold climates?
They can work in cold climates when the installation space stays within the model's operating range and the pipes are protected from freezing. A cold garage or exterior closet can reduce heat-pump operation and increase resistance heating, so location and manual requirements matter more than the state name alone.
Can I use a continuous hot-water recirculation pump?
ENERGY STAR advises against continuous circulation with heat pump water heaters because it can force Electric Only operation and increase energy use. Use an on-demand or occupant-activated strategy when the system and model support it.
Before you approve an installation quote, use Watt Wallet's cost guide to separate equipment, electrical, plumbing, drainage, and permit scope in the total price.