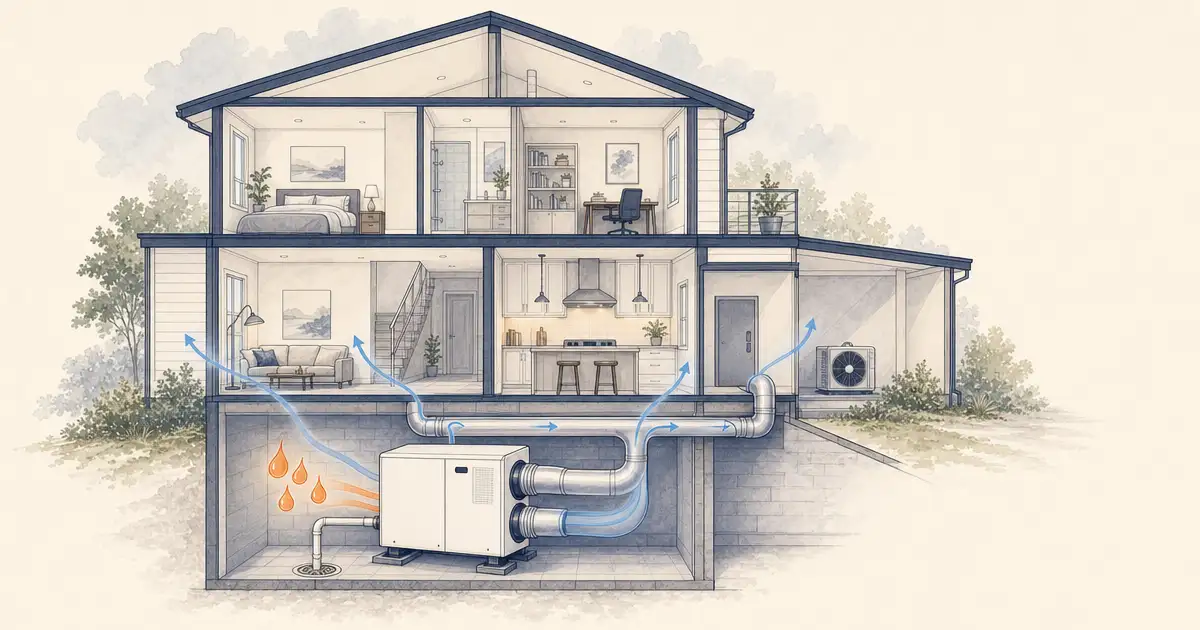
High indoor humidity can show up as sticky rooms, window condensation, a musty basement, or an air conditioner that cools the house before it dries it. A whole-house dehumidifier can run when the air conditioner is off, but the unit still needs the right airflow path, drain, controls, and service access.
At Watt Wallet, we use the same planning approach we bring to other home-energy projects: separate the moisture problem from the equipment choice, then compare the written scope before comparing prices. This guide walks through that process, including duct layouts, sizing questions, installation costs, and the handoff checks that protect the performance you paid for.
Start with the moisture problem
Measure indoor relative humidity before choosing equipment. Use a hygrometer in the main living area and in the dampest room, then record readings during the part of the year when the problem is worst. The EPA's moisture guidance recommends keeping indoor humidity below 60%, ideally between 30% and 50%.
That reading is a starting point, not a diagnosis. Check for:
- plumbing, roof, foundation, crawl-space, or HVAC drain leaks
- gutters and downspouts that leave the foundation wet
- bathroom and kitchen exhaust that does not vent outdoors
- a clothes dryer that leaks moisture into the home
- open crawl spaces, damp basements, or standing water
- outdoor air entering through duct leaks, gaps, or an unbalanced ventilation system
- an air conditioner that reaches the temperature setpoint quickly and shuts off before removing enough moisture
Fix liquid water and major air leaks before sizing a dehumidifier. A dehumidifier can lower the humidity in the air, but it cannot repair a leak or clean up an existing water-damage problem. The EPA recommends drying wet materials promptly and addressing the moisture source when mold or dampness is present.
The air conditioner matters too. Cooling equipment removes moisture while it runs, so a system that is oversized or rarely runs can leave the house humid even when the temperature feels comfortable. The Building America whole-house dehumidification guide explains why this is common during mild, humid weather and why supplemental dehumidification should not compensate for excessive air leakage or poor HVAC sizing.
Choose the right type of dehumidifier
“Whole house” describes the area you want to control. It does not describe one universal installation method.
| Type | Air path | Best fit | Main tradeoff |
|---|---|---|---|
| Portable unit | Room air passes through a self-contained appliance | One room, a seasonal problem, or a quick diagnostic | Limited distribution and regular bucket or drain management |
| Independent ducted unit | The dehumidifier has its own return and supply ducts to the living space | A home with ductless heating and cooling, or a house where the central ducts cannot distribute dry air well | Requires separate duct runs and grilles |
| Integrated ducted unit | The dehumidifier connects to the central air handler's return or supply side | Several rooms already served by a central duct system | The duct layout, fan controls, and static pressure have to work together |
The Department of Energy's Building America guidance separates independent ducted and integrated ducted systems for this reason. An independent unit can serve a home with mini-splits or another ductless system. An integrated unit can use the existing distribution network, but a central fan may need to run whenever the dehumidifier operates.
If only a basement, laundry room, or crawl space is damp, a zoned solution may cost less and address the real problem more directly. If humidity stays high throughout a relatively well-sealed home, a ducted whole-home system makes more sense. A dehumidifier also does not automatically provide fresh air. If ventilation is part of the goal, the proposal should identify a ventilating dehumidifier or a separate balanced ventilation system and show how the outdoor-air dampers are controlled.
What a whole-house installation connects
Every installation has three paths:
- Air path: Humid air enters the dehumidifier, moisture condenses on its coil, and drier, slightly warmer air leaves through a return or supply route.
- Water path: Condensate leaves the drain pan through a gravity line or a condensate pump and ends at an approved drain.
- Control and power path: A humidistat calls for dehumidification, the unit starts, and the central blower runs when the selected duct arrangement requires it.
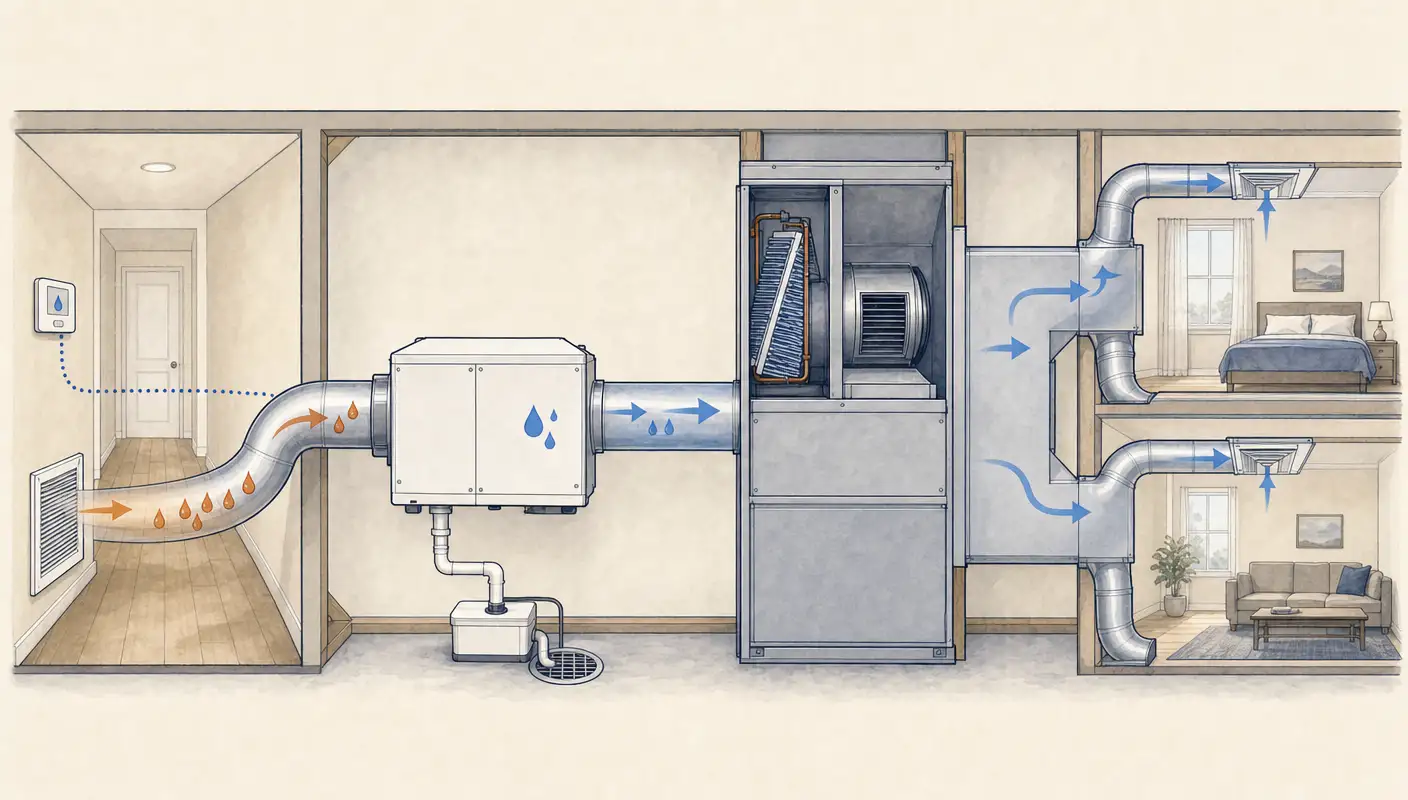
Simplified layout, not wiring instructions.
The installer may propose one of these airflow arrangements:
- Dedicated return to supply: A central return grille feeds the dehumidifier, and the dry-air outlet connects to the supply plenum. The unit's own blower can often distribute dry air without waiting for the air handler, provided the model and duct design allow it.
- Dedicated return to HVAC return: The dehumidifier draws from a central area and discharges into the HVAC return. This can be a valid manufacturer-approved design, but the air handler usually has to run at the same time so dry air reaches the rooms instead of circulating around the return side.
- Independent supply and return grilles: The dehumidifier has no HVAC connection. This is the usual direction for a ductless home or a home where a central tie-in would create poor airflow. The grilles should be placed to pull from and supply different parts of the conditioned space.
- Bypass or loop connection: The unit diverts part of the existing return airflow through the dehumidifier and sends it back into the supply. This can reduce new ductwork, but the proposal should show the dampers, backflow protection, airflow rate, and fan controls.
There is no universal best connection. The exact model manual, existing duct layout, blower controls, and available static-pressure capacity decide which arrangement is appropriate. A proposal that only says “connect to the return” leaves out the part that determines whether the rooms will actually receive dry air.
Five decisions to settle before ductwork starts
1. Size the unit for the moisture load
Capacity is usually listed in pints of water removed per day. Square footage can help narrow the options, but it cannot account for climate, air leakage, insulation, basement or crawl-space moisture, occupants, indoor drying, ventilation, or how often the air conditioner runs.
Ask the contractor to explain:
- the target indoor humidity
- the home's climate and measured humidity
- the latent load or other sizing method used
- the expected contribution from the existing air conditioner
- the unit's rated capacity and efficiency at the conditions that matter
ACCA's Manual S equipment-selection guidance includes dehumidification equipment and emphasizes local climate, load information, and manufacturer performance data. That is a better basis for a quote than “one pint per square foot” or a capacity copied from the old unit.
The ENERGY STAR dehumidifier buying guidance also warns that capacity ratings are measured under specified conditions. Two units with similar pint-per-day labels may not perform the same way in your basement, attic, or mechanical room. Compare the model's tested performance and installation requirements, not the label alone.
2. Pick a serviceable location
Basements, mechanical rooms, utility closets, crawl spaces, and attics can all work. The location needs:
- protection from rain, flooding, freezing conditions, and excessive dust
- a level support or an approved hanging method
- enough room to remove the filter and reach the drain, controls, and duct connections
- a practical route to power and an approved drain
- a way to contain water if a fitting, drain, or pump fails
An attic installation deserves extra attention. The quote should identify the support, secondary drain pan, overflow protection, access route, and insulation on any ductwork in unconditioned space. The dry-air outlet can be warmer than the surrounding air, so do not aim it at a thermostat or place it where the heat will create a comfort complaint.
3. Design the condensate drain
Most whole-home units are drain-only systems. ENERGY STAR says the drain should run to a floor drain or condensate pump during professional installation. A gravity line needs a continuous fall to the drain. A pump is needed when the unit sits below the drain or the line cannot maintain that slope.
The installer should also specify the trap or air-break arrangement required by the equipment and local plumbing rules, secure the line, and test it with water. Ask for a float switch or other shutoff when a blocked drain could damage the home. Our condensate pump guide explains the situations where a pump changes the installation scope.
4. Coordinate the humidistat, blower, and electrical work
The humidistat belongs in a representative area of the home, away from a supply register, exterior door, window, water source, or unusually warm wall. The control setting should reflect the climate and season. ENERGY STAR identifies 30% to 50% as the general building range and notes that colder homes may need 30% to 40% during the heating season to limit window condensation.
If the unit ties into the HVAC system, the control sequence should state whether the air-handler fan starts with the dehumidifier. If the unit includes outdoor-air ventilation, the sequence should also state when the fresh-air damper opens and when it locks out during extreme outdoor conditions.
Electrical connections, disconnects, and any new circuit must follow the model instructions and local code. Do not remove an electrical panel cover or wire the control circuit as a homeowner project. The written quote should identify who handles electrical work, permits, inspections, and final labels.
5. Commission the whole system
Startup is more than turning the unit on. Before the job is closed, ask the installer to demonstrate or document:
- the direction of airflow through the unit and the connected ducts
- the blower interlock or standalone operating mode
- airflow and static-pressure checks when the unit connects to existing ductwork
- the humidistat call and the actual response from the unit
- condensate flow, pump operation, and overflow shutoff
- filter size, access, and replacement interval
- unusual vibration, noise, warm-air discharge, or air leakage at duct connections
- model and serial numbers, warranty documents, permit status, and the maintenance plan
If humidity is still high after the system runs through the problem season, the next diagnosis should include moisture sources, outdoor-air leakage, duct distribution, controls, and unit capacity. Buying a larger unit without finding the reason is an expensive guess.
What belongs in the installation quote
Use the same scope for every bidder. A useful proposal separates these lines:
| Quote line | What the scope should state |
|---|---|
| Equipment | Exact model, rated capacity, efficiency, controls, filter, and warranty |
| Ductwork | Return and supply locations, collar sizes, dampers, sealing, insulation, and any plenum changes |
| Drainage | Gravity or pump route, trap, termination, pan, float switch, and testing |
| Controls | Humidistat location, target range, blower interlock, and any ventilation controls |
| Electrical | Existing outlet or new circuit, disconnect, wiring, labels, permit, and inspection responsibility |
| Startup | Airflow or static-pressure checks, drain test, control test, filter handoff, and documentation |
Bring the same questions to every contractor. Watt Wallet's HVAC contractor checklist covers model numbers, load calculations, written scope, permits, controls, and the details that make two home-energy quotes comparable.
Whole-house dehumidifier installation cost
Current national cost guides put many basic professional installations around $1,300 to $2,800, including the unit and basic labor. This Old House's installation guide lists that range for its project, and Angi's 2026 cost breakdown uses the same range for a typical installation.
Treat that figure as a starting point. A quote can rise when the job needs:
- long or difficult duct runs, a new return grille, or plenum modifications
- a condensate pump, secondary pan, or overflow shutoff
- a new electrical circuit or control upgrade
- attic, crawl-space, or other difficult access
- duct sealing or insulation in unconditioned space
- permits, inspection work, equipment removal, or repairs around the installation area
The equipment price is only one part of the project. A lower quote that omits the drain pump, fan interlock, startup testing, or permit work is not a lower price for the same installation.
Is whole-house dehumidifier installation a DIY job?
Homeowners can measure humidity, photograph the existing HVAC and drain area, compare written scopes, and ask how the installer chose the capacity. Cutting plenums, installing duct takeoffs, routing a condensate line, wiring controls, adding circuits, and checking airflow or static pressure belong with qualified HVAC and electrical trades.
The risk is larger than a unit that fails to start. A poor airflow path can leave rooms untreated, a blocked drain can damage the home, and an incorrect control sequence can make the HVAC blower run at the wrong time. Follow the equipment manual and local requirements through a professional installation rather than copying a diagram from another model.
Whole-house dehumidifier installation FAQ
Can you install a whole-house dehumidifier without central air?
Yes, when the selected unit supports an independent ducted configuration. The system uses its own return and supply grilles to circulate air through the living space. This requires new ductwork and careful grille placement. A portable basement unit is a different, room-level solution.
Does a whole-house dehumidifier replace an air conditioner?
No. It removes moisture and usually sends slightly warmer air back into the home. It can run during spring and fall or other periods when the air conditioner is not calling for cooling, while the air conditioner remains responsible for temperature control.
Does it replace an ERV or HRV?
No. A dehumidifier controls moisture. An energy recovery ventilator or heat recovery ventilator exchanges indoor and outdoor air with a different control goal. Some dehumidifiers can accept outdoor air, but the proposal should show the ventilation rate, filters, dampers, and control logic instead of treating the two systems as interchangeable.
What humidity should I set?
Start within the equipment manufacturer's range and the home's comfort needs. The EPA and ENERGY STAR guidance puts the general target around 30% to 50% relative humidity, with colder homes often needing a lower winter setting to limit condensation. If windows or cold surfaces still collect water, the cause may be insulation, air leakage, or a moisture source rather than a control setting alone.
Do I need a permit?
Permit requirements vary by location and by the work included. Adding equipment, cutting ductwork, changing electrical circuits, or routing plumbing can each trigger different requirements. Ask the contractor to name the permit and inspection responsibilities in the written scope instead of leaving them as an assumption.
Whole-house dehumidifier installation works when the equipment, air path, water path, and control sequence fit the home. Start with measured humidity and moisture sources, then compare proposals that show the capacity basis, duct layout, drain protection, electrical scope, and startup checks. When you are ready to compare bids, use Watt Wallet's HVAC contractor questions to put those decisions in writing before you sign.